One of the most interesting features in the current .NET 6 version, from my point of view, is Minimal APIs – a very interesting concept that aims to offer a highly efficient way to create APIs with fewer resources.
It can be a good option for scenarios like microservices or applications with few dependencies. This concept meets the growing trend of simplified API creation, similar to Python or Express (a Node.js framework).
ADVANTAGES
-
For beginners, this model is much simpler and helps understand basic API concepts;
-
It significantly reduces the amount of code required, as there is no longer a need to create filters, routes, and even controllers;
-
The concept helps simplify the written code, making it more readable.
DISADVANTAGES
- Misusing the model can be problematic, as it needs to be validated if it makes sense for your project;
- Excessive growth of the “cs” file, as the code is predominantly contained in this file by design;
- Creating workarounds to avoid excessive code in the “cs” file goes against the concept, leading to clutter and difficulties in maintenance or evolution.
LET'S GET TO WORK!
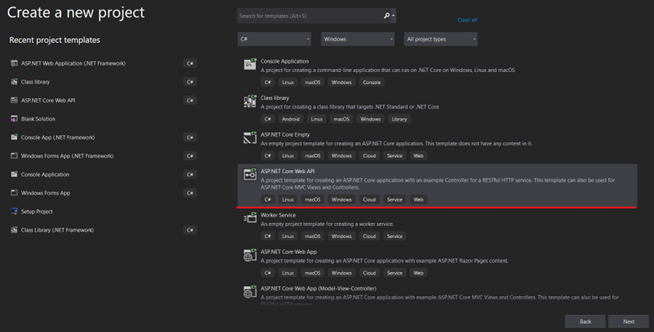
Open Visual Studio 2022 and select the option “Create a New Project”.

Choose the option “ASP.NET Core Web API” as the project type.
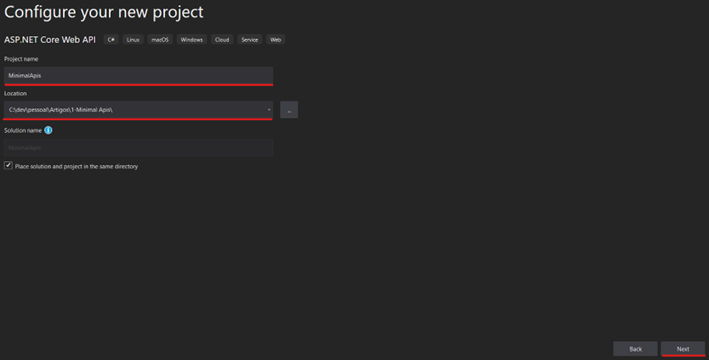
Provide a name for your solution, specify the location where the project will be created, and click “Next”.
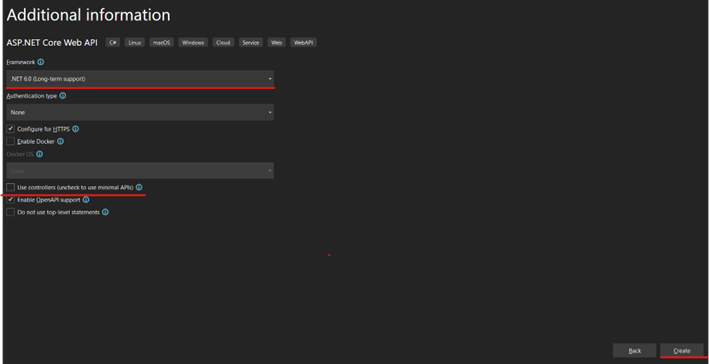
Select the .NET 6 version (LTS), uncheck the “Use Controllers” option (if you want a minimal model), and click on “Create”.
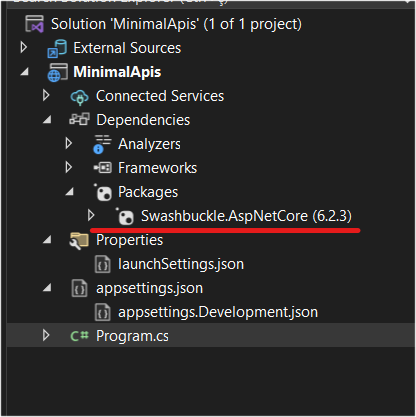
Right from the start, you can see that the project structure is smaller than what we are typically used to. The project already includes the installed option of the OpenApi package (selected in the previous step), or “Swagger” if you prefer.
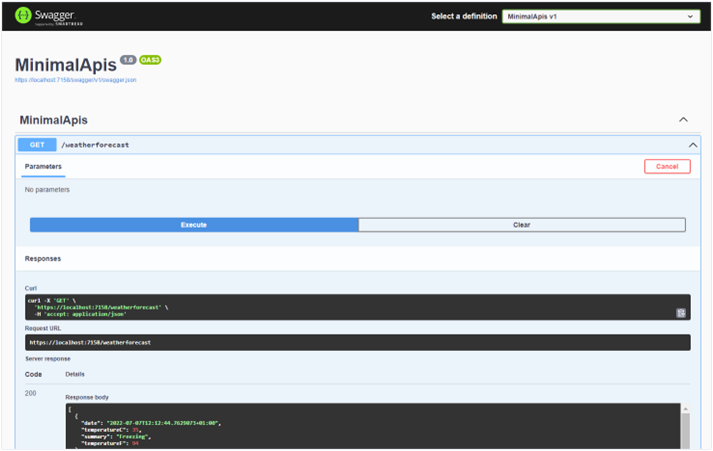
In other words, with just a few steps we have a ready-to-use API running the default “WeatherForecast” project model that exists in .NET projects.
But of course, this alone does not mean learning about Minimal APIs. So now let's create some real examples to truly understand their functionalities.
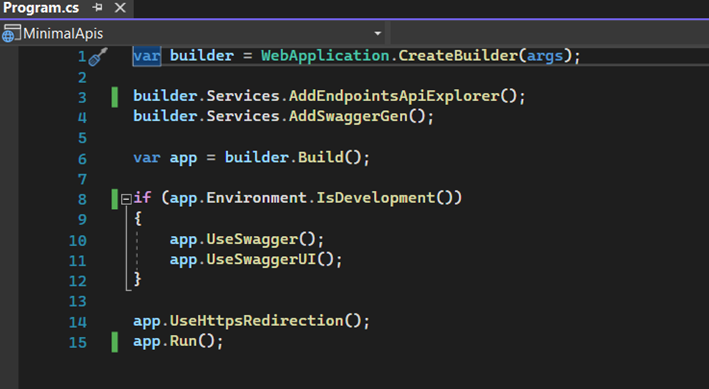
First, let's go to the “Program.cs” file, delete the comments and methods from the initial project. The file should look like this:
From here, we will create a slightly more complete version. The idea is to create a customer registry and use “Entity Framework Core” to keep the data in an “Sql Server” database.
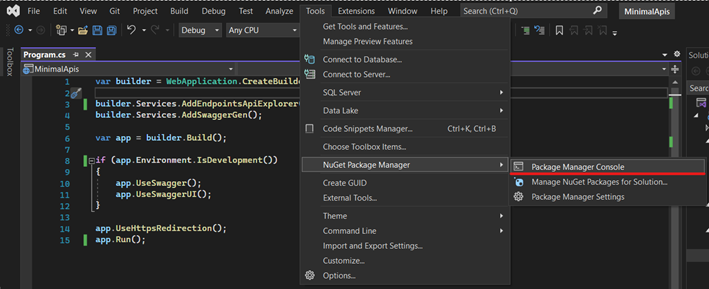
There are packages that we need to install, so open the “Package Manager Console”. If it's not available at the bottom of Visual Studio, you can enable it through the menu => Tools/Nuget Package Manager/Package Manager Console.
In the Package Manager Console, you should enter the following command:
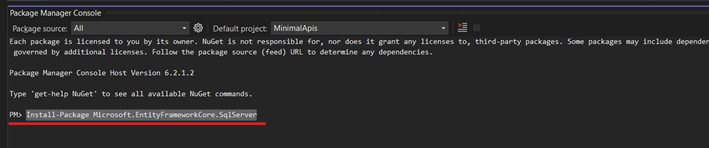
Repeat the same command for the following packages:
- Install-Package Microsoft.EntityFrameworkCore
- Install-Package Microsoft.EntityFrameworkCore.SqlServer
- Install-Package Microsoft.EntityFrameworkCore.Tools
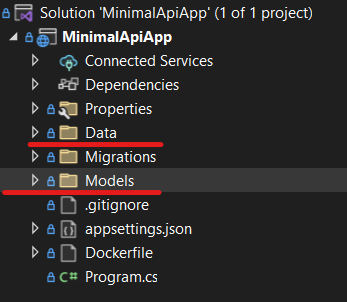
Next, let's create two folders in our project: “Data” and “Models”.
Inside the “Models” folder, let's create our “Customer” entity.
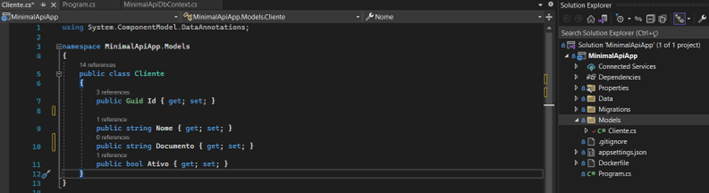
Our customer has an ID, Name, Document, and a field to indicate whether they are active or inactive.
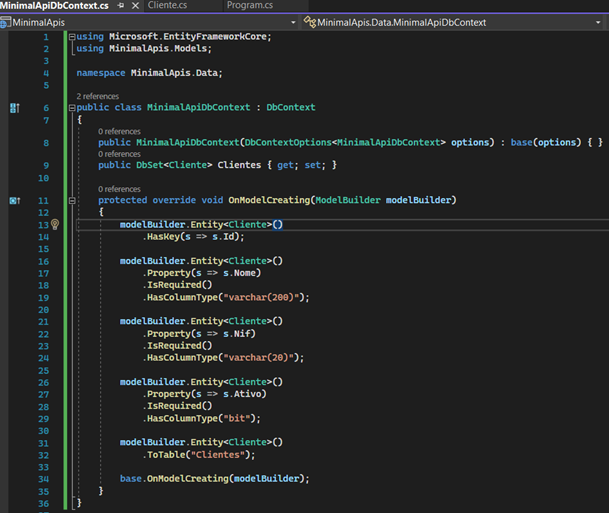
Now, let's create our DbContext, which will help us handle the data with Entity Framework Core and model our “Customers” table for the Sql Server.
Create a class inside the “Data” folder called “MinimalApiDbContext.cs”. In this same file, we will model the necessary configuration for our “Customers” table. It's not a mandatory step, but I always do it because it allows us to model each field with the correct type and size. Otherwise, the table will be created with default types and sizes, so I consider it a good practice.
At the end, this class should look like this:
Well, we've come a long way. We've configured our project, created our “Customer” entity, created our DbContext, and configured our table to be kept in the database.
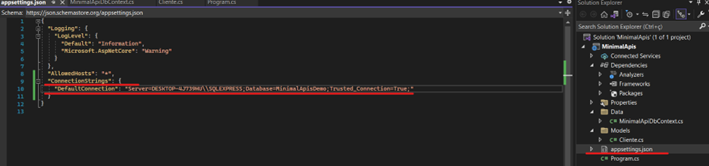
Speaking of the database, we need to indicate to our API the connection string it should use throughout the application's lifecycle. To do this, go back to the “Program.cs” file and add the context, specify the database to be used, and provide the connection string. Here's an example:
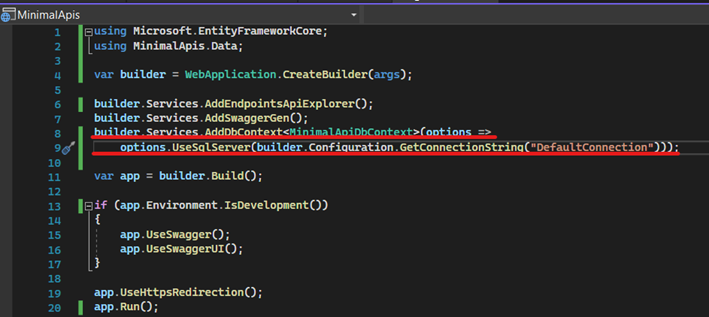
Next, since we are telling the application that we will use the connection named “DefaultConnection”, we need to actually include it in the application's configuration file. To do this, open the “appsettings.json” file and add these two lines:
Alright, we're almost there!
Now that everything is properly configured, we need to execute the Migration, which means using Entity Framework Core based on our configurations. It will materialize our table in the database in two steps:
1. Enter the command “Add-Migration initial -Context MinimalApiDbContext -v”:
-
Add-Migration: EF Core command to add a new migration;
-
Initial: The name I gave to this migration. It can be any name that facilitates identifying what is being migrated/created/changed in the database;
-
-Context: The name of the context, which in our case is the same as the class we created for the context, “MinimalApiDbContext”;
-
-v: Also known as verbose, as the name suggests, it provides more detailed output in the console when the migration occurs. It is optional, but I always use it as it helps a lot when errors occur during migration.
2. If everything goes well in the previous step, we should then run the command “Update-Database -Context MinimalApiDbContext -v”. This will take the metadata generated in the migration and create what we configured in the Sql Server.
As we can see now:
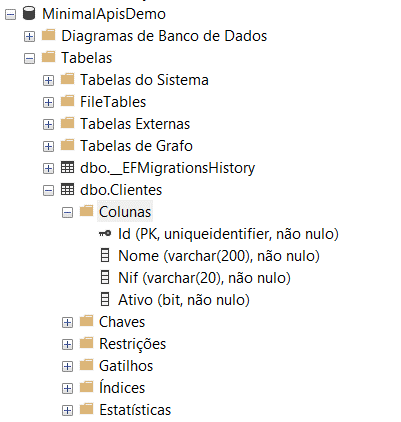
We have our database created and our “Customers” table. Entity Framework Core also creates an additional table called “__EFMigrationsHistory”, but I won't go into that topic now, perhaps another time.
HOW TO CREATE ENDPOINTS?
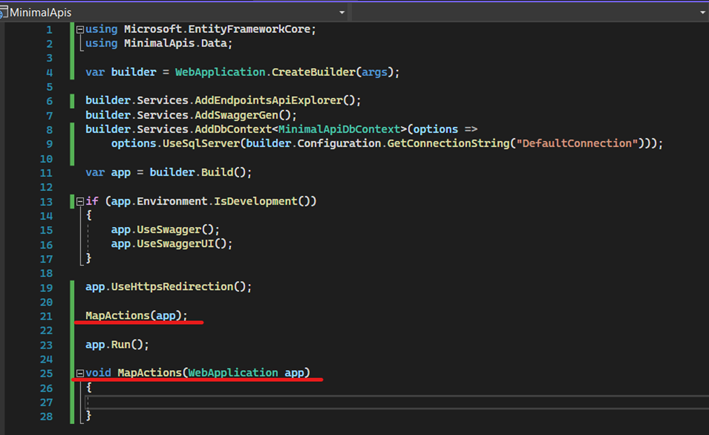
In our “Program.cs” class, let's create a void method that will centralise the flow of our HTTP methods. It would be something similar to a Controller, in case you need a reference:
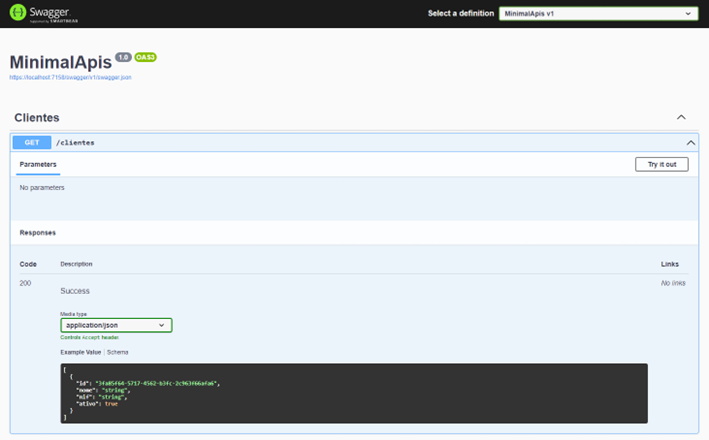
Now, let's create our first endpoint – I'll call it “/clientes” (customers). The HTTP methods, in the case of a Minimal API, are always represented by a pattern where the beginning is “Map2" + "HTTP method”. For example, “MapGet”, “MapPut”, “MapPost”, and so on. Here's an example:
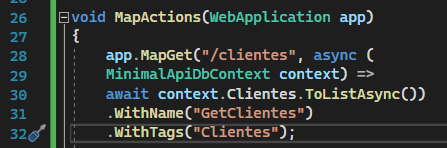
Note that the route is “/clients”, passed as a parameter, in the “MapGet” method. Within this method, we also pass the context and then call the method in our context that best suits the situation, which in this case is listing customers. We can even name this endpoint “GetClientes” (GetCustomers), and an interesting functionality is the TAGS that I called “Clientes” (Customers). Now we can run our application with this first example.
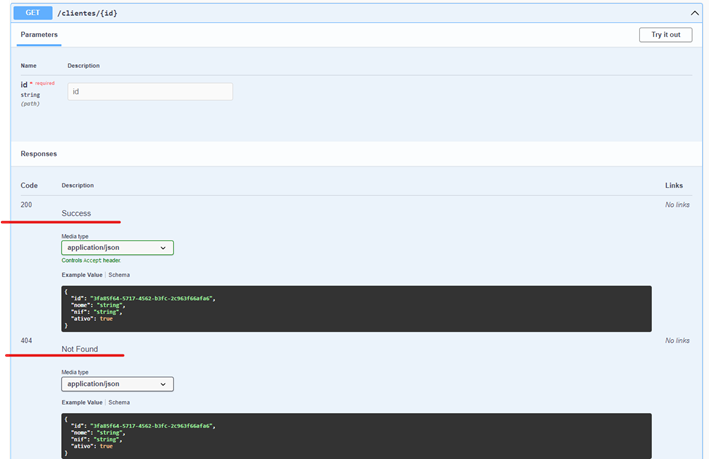
Following the same line of thought, it makes sense to have an endpoint that can serve a request to retrieve a specific customer, for example, by their ID.
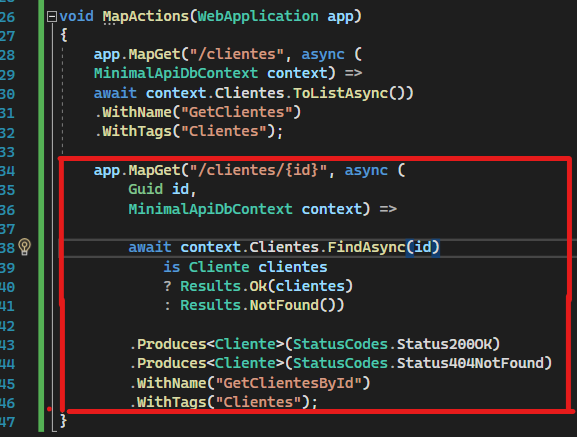
This example shows that our route now receives the name “/clientes/{id}” (customers/{id}), which is different from before. Now we also pass the Id we received in the request to the “MapGet” method, then the context, and finally retrieve the customer using the “FindAsync(id)” method. As a good practice, I emphasize that we should perform some verifications, such as if this customer exists, and return the correct status code to the requester – in this case, either a 200 or a 404.
As a good practice, I also added “Produces”, which is equivalent to “ProducesResponseType” in a Controller. It helps standardise and improve documentation for those who will consume the API, allowing them to understand what types of responses that endpoint can return.
Okay, now we know how to create a “Get” and a “GetById” endpoint. Let's make our application evolve to include a “POST” endpoint.
Example:
P.S: Here's a valuable tip: there is a package that we're going to install that will help us validate the requests we receive. Let's install the package “Install-Package MiniValidation -Version 0.6.0-pre.20220527.55”. At the time of writing this article, the version is in pre-release, so the full command should be executed.
If you're interested in learning more about the project, here's the link.
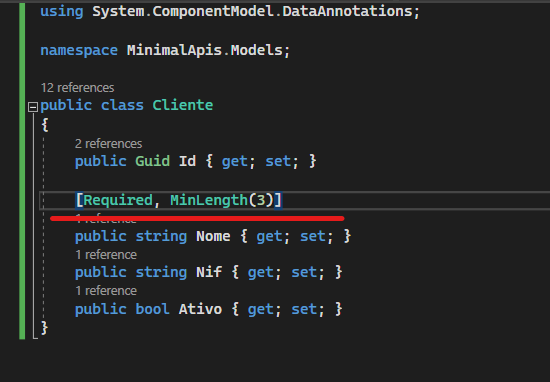
This package will help us create validations based on “Data Annotations” configured in our entities. Let's give an example by modifying our “Clientes.cs” class and including a validation where the client's name must have a minimum of 3 characters.
Now, let's go back to “Program.cs” and create our “MapPost” endpoint.
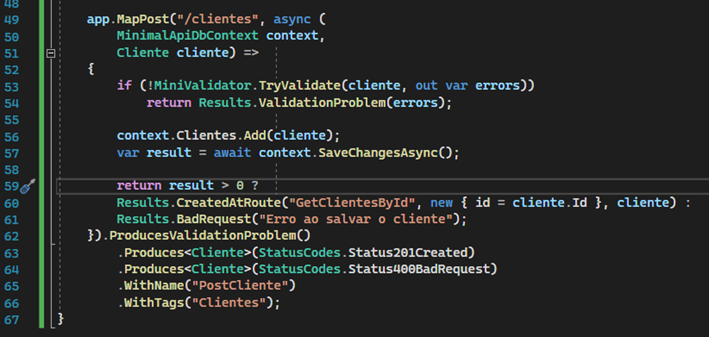
Here, we can already notice some new things. On line 49, we'll keep the pattern and call the route “/clients”, our context and the input model.
Next, we'll use our “MiniValidator” feature to handle the validation of our client entity. If any errors occur, we can return the result to the API consumer. Here's an example:
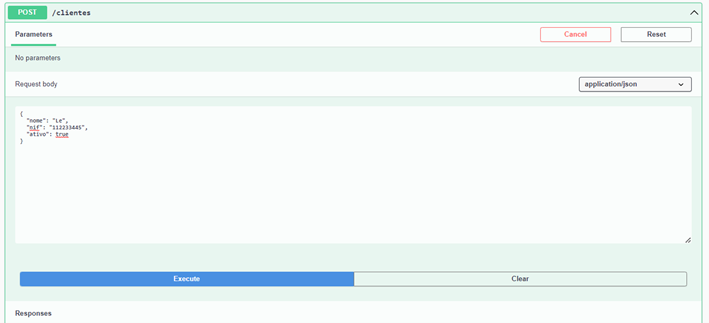
Request:
Response:
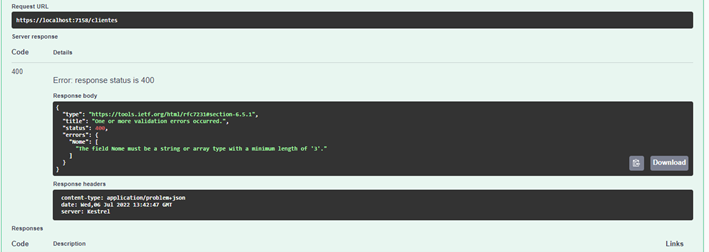
Notice how interesting it is that the validation with MiniValidation has taken care of everything and returned the error message, indicating where and what the problem is.
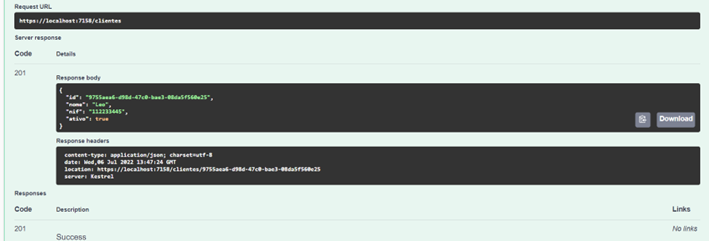
Continuing with the analysis of “MapPost”, we see that it will keep the data in SqlServer. If successful, we'll use the “Results.CreatedAtRoute” feature, which will basically return the response by calling our previously created “GetById” endpoint. It does this using the name “.WithName(“GetClientesById”)” that we configured when obtaining the client by code.
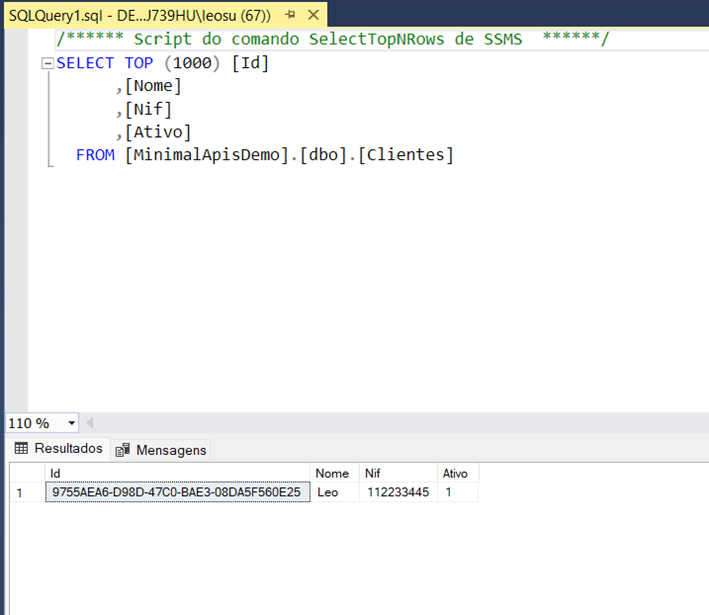
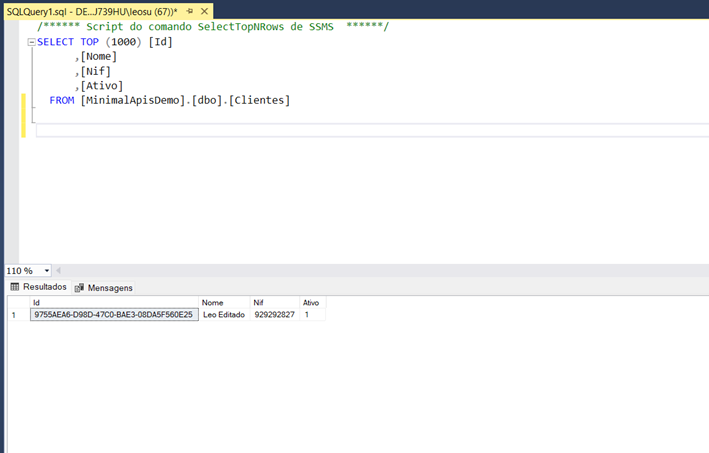
In the Sql Server:
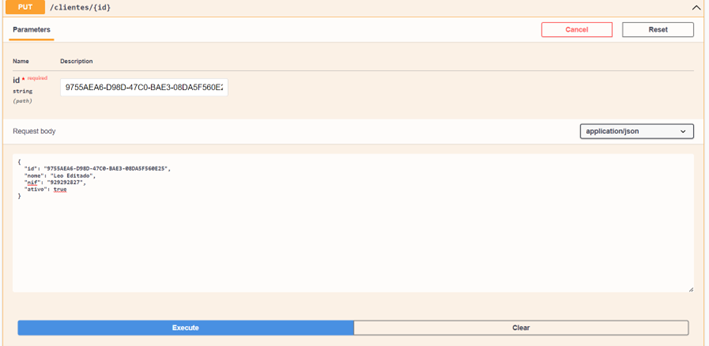
I would say that “MapPut” is very similar to “MapPost”, but the difference when consuming our context is the call to the Update method.
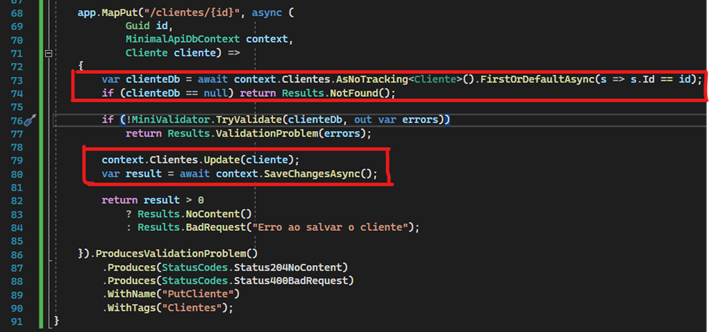
In other words, first we try to find the client in the SqlServer. If we find it and pass the validation, the data should be kept in the SqlServer.
Finally, we have our “MapDelete” endpoint, which is much simpler. It just needs to find the desired record to verify its existence and remove the record from the SqlServer.
Example:
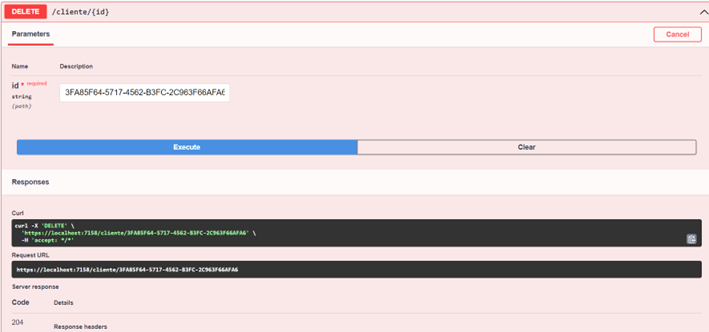
We have successfully deleted our record.
And that's it! The link to the source code is on my GitHub (if you want to rate it, I appreciate it 😊).